How To Hide A Slide In Powerpoint? To hide a slide in PowerPoint, right-click on the slide thumbnail, select “Hide Slide” from the dropdown menu, ensuring it won’t be visible during the presentation but remains part of the file.
Have you ever wanted to skip over unnecessary information during a presentation, keep certain details confidential, or simply save time?
In this article, we will explore the reasons why you may want to hide a slide in PowerPoint. We will walk you through the step-by-step process of hiding and unhiding slides, as well as provide some useful tips for utilizing this feature effectively.
Key Takeaways:
- Skipping over unnecessary information is one reason to hide a slide in PowerPoint. This helps keep your presentation concise and engaging for your audience.
- Confidential information can be hidden on a slide to ensure it is not accidentally shown during a presentation. This is especially useful for sensitive information.
- Hiding slides can save time during a presentation by allowing you to focus on the most relevant information. This can help you stay within your allotted presentation time.
Why Would You Want to Hide a Slide?
Hiding slides in PowerPoint can serve various purposes such as skipping unnecessary information, maintaining confidentiality, and saving time during presentations.
By concealing slides, presenters can ensure that only the most relevant content is shared, engaging audiences more effectively. This strategic approach not only removes distractions but also maintains a cohesive presentation flow, enhancing the overall delivery. Hiding slides can safeguard sensitive information or confidential data from being displayed unintentionally, providing a layer of security during the presentation. This practice enables speakers to focus on key points and deliver a concise, impactful message without cumbersome detours or interruptions.
To Skip Over Unnecessary Information
One common reason to hide a slide in PowerPoint is to skip over sections that contain unnecessary information, streamlining the presentation for a more focused delivery.
By removing unwanted details, you enhance the flow of your presentation, keeping your audience engaged and avoiding distractions. Hiding slides can also help in maintaining the coherence of your message, ensuring that the main points stand out without being diluted by irrelevant content.
A focused presentation not only saves time but also increases the impact of your key messages. It allows you to drive your narrative forward smoothly and helps in conveying your ideas with clarity and precision.
To Keep Information Confidential
Hiding slides in PowerPoint is a strategic way to keep sensitive or confidential information safeguarded during a presentation, ensuring data security and privacy.
By strategically hiding certain slides, presenters can ensure that only authorized individuals have access to specific details, maintaining the confidentiality of crucial information. This practice not only helps in protecting proprietary data but also reinforces the trust between the presenter and the audience.
Implementing secure data methods within presentations acknowledges the vital importance of safeguarding sensitive information. Incorporating privacy measures through slide concealment also demonstrates a commitment to maintaining data integrity and respecting individual privacy boundaries.
To Save Time During a Presentation
Utilizing the hide slide feature in PowerPoint can significantly save time during a presentation by eliminating the need to cover unnecessary content, allowing for a more concise and efficient delivery.
By strategically hiding slides that contain additional details or are not relevant to the current topic being discussed, presenters can shift their focus to the most crucial aspects of their message. This approach promotes a more engaging and impactful presentation, maximizing audience attention and comprehension.
Incorporating the hide slide feature in PowerPoint not only enhances time management but also aids in maintaining a seamless flow throughout the presentation. Presenters can smoothly navigate through key points without disruptions or distractions, demonstrating presentation optimization at its finest.
How to Hide a Slide in PowerPoint
Hiding a slide in PowerPoint involves a straightforward process that includes selecting the desired slide, right-clicking on it, and choosing the ‘Hide Slide’ option from the context menu.
After selecting the slide and right-clicking, a context menu appears with various options. To hide the slide, navigate to the ‘Hide Slide’ option within this menu. Click on it, and the selected slide will be hidden from the presentation. It’s an efficient way to manage your slides without deleting them permanently. Remember, hidden slides are not visible during the standard slideshow but can still be accessed and unhidden through the user instructions provided by PowerPoint.
Step 1: Open PowerPoint and Navigate to the Slide You Want to Hide
The first step in hiding a slide in PowerPoint is to open the presentation and navigate to the specific slide that you wish to conceal from the audience.
To access the slide, you can either click on the thumbnail view on the left side of the screen or use the slide sorter at the bottom. Once you have successfully located the slide in question, the next crucial step is to initiate the process of hiding it. This ensures that only the intended content is displayed during the presentation, maintaining a coherent flow and enhancing the overall impact of your slides.
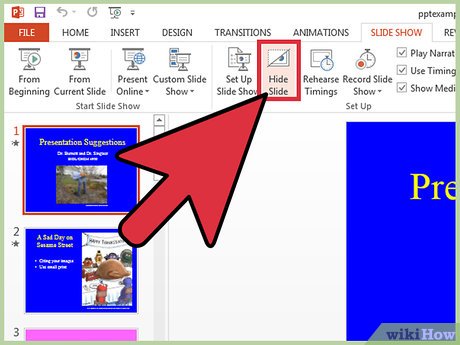
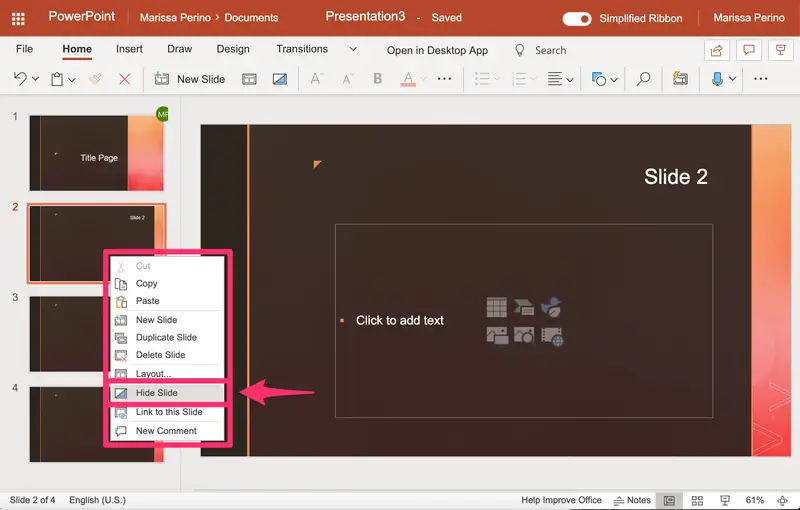
Step 2: Right Click on the Slide and Select ‘Hide Slide’
Once you have identified the slide, right-click on it to reveal a context menu, then select the ‘Hide Slide’ option to conceal it from the presentation sequence.
When you right-click on a specific slide, you trigger a menu to pop up, offering various slide-related actions. This user interface interaction allows you to access a range of options, such as changing the slide layout, duplicating the slide, or even deleting the slide entirely. By choosing the ‘Hide Slide’ option from this context menu, you effectively remove the slide from the visible lineup without permanently deleting it from your presentation.
Step 3: Confirm that the Slide is Hidden
To ensure that the slide has been successfully hidden, verify by checking for its absence in the presentation view or using the slide sorter to confirm its concealment.
Confirming the hidden status of a slide is crucial to ensure that the intended effect has been achieved without any oversight. After hiding a slide, the next step involves a verification process to double-check that it is indeed missing from the presentation view. This confirmation step can be done visually by scrolling through the slides or using the slide sorter in PowerPoint to inspect the sequence and confirm the absence of the concealed slide. By performing these validation steps, users can guarantee that the content they wanted to keep hidden is not inadvertently visible during the presentation.
How to Unhide a Slide in PowerPoint
Reversing the hiding process in PowerPoint involves navigating to the hidden slide, selecting it, right-clicking, and choosing the ‘Unhide Slide’ option to restore it back to the presentation sequence.
Locating a hidden slide is crucial in maintaining the flow and coherence of your presentation. To find the concealed slide, go to the left pane where slide thumbnails are displayed. Scroll through the slides until you reach the hidden one, which might appear grayed out.
Once you’ve spotted the slide, click on it to select it. Right-click on the selected slide to reveal a context menu with various options. From this menu, choose the ‘Unhide Slide’ option to bring the slide back into visibility.
Step 1: Navigate to the Hidden Slide in the Slide Pane
Locate the hidden slide within the slide pane by carefully scanning and identifying the slide that has been kept concealed from the standard presentation view.
Once you have visually inspected the list of slides in the slide pane, look for any slide that might appear out of order or skipped, indicating it could be the hidden one. Also, pay attention to any slide titles or content that seem unfamiliar or not part of the main sequence. Upon spotting the concealed slide, click on it to select it. This action is crucial as it prepares the slide for potential reintegration into the presentation.
Step 2: Right Click on the Slide and Select ‘Hide Slide’
Once the hidden slide is located, right-click on it to access the context menu, then choose the ‘Unhide Slide’ option to make it visible within the presentation.
By performing a right-click, a menu will appear offering various options for managing the slide. This action brings up the context menu where you can find the ‘Unhide Slide’ function. Visibility restoration of the hidden slide is crucial for maintaining the logical flow of your presentation. Selecting this option seamlessly integrates the previously hidden slide back into the sequence, ensuring a coherent and comprehensive delivery of your content.
Step 3: Confirm that the Slide is Unhidden
After unhiding the slide, verify its status by checking for its presence in the presentation view or using the slide sorter to confirm its return to the slide sequence.
It is crucial to ensure that the slide that was previously hidden is now correctly integrated back into your presentation. A straightforward way to confirm this is by visually inspecting your presentation view or using the slide sorter function. By conducting this re-verification process, you can ascertain that the slide’s visibility has indeed been restored.
Tips for Using the Hide Slide Feature
Maximize the effectiveness of the hide slide feature in PowerPoint by utilizing slide numbers to track hidden slides and rehearsing timings to seamlessly integrate concealed content during presentations.
By assigning specific slide numbers to each hidden slide, you can easily keep track of their sequence and ensure a smooth flow in your presentation. Leveraging rehearsal timings allows you to practice incorporating the hidden content naturally into your speech, enhancing the overall delivery and impact of your presentation.
Content integration becomes seamless when you strategically place hidden slides throughout your presentation to supplement key points or provide additional detail without disrupting the main flow. This technique not only enhances the overall quality of your presentation but also keeps your audience engaged and interested.
Use Slide Numbers to Keep Track of Hidden Slides
Assigning slide numbers to hidden slides in PowerPoint can aid in efficient tracking and organization, allowing presenters to manage and reference concealed content with ease.
By incorporating slide numbers to hidden slides, presenters can streamline their presentations by enhancing the organization of their content. This practice not only improves the overall structure but also contributes to better tracking optimization.
When specific information needs to be revisited, having numbered hidden slides simplifies the process of content referencing. It enables presenters to quickly retrieve pertinent details, enhancing the flow and coherence of their presentations.
Assigning slide numbers to hidden slides enhances the presenter’s ability to control the sequence of information delivery, resulting in a more engaging and dynamic presentation.
Use the ‘Rehearse Timings’ Feature to Practice Presenting with Hidden Slides
Leverage the ‘Rehearse Timings’ feature in PowerPoint to practice presenting with hidden slides, ensuring a seamless and well-timed delivery that incorporates both visible and concealed content.
By utilizing this feature, you can meticulously rehearse your presentation, ensuring every slide transition, animation, and narration align perfectly with your intended pace. This tool allows you to gauge the timing of each slide, including those that are not visible during the initial run-through. It’s a valuable asset for refining your delivery practice, helping you to polish the synchronization between your verbal explanation and the accompanying visuals.
Conclusion
Mastering the hide and unhide slide features in PowerPoint can give the power to presenters to customize their presentations, maintain data privacy, and optimize the delivery of information.
Customization benefits are key when it comes to presenting information effectively. By strategically hiding certain slides, presenters can tailor their message to specific audiences, ensuring a more personalized and engaging experience. This level of customization not only adds a professional touch to the presentation but also allows for better control over the flow of information.
Utilizing the hide feature in PowerPoint contributes to enhanced data protection. Sensitive or confidential information can be safeguarded by selectively hiding slides that contain such data, thus minimizing the risk of unauthorized access during the presentation.
Information optimization is another significant advantage of mastering the hide and unhide slide functions. By structuring the content and deciding which slides to reveal at different stages, presenters can create a more impactful and coherent narrative, capturing the audience’s attention more effectively.
Frequently Asked Questions
1. How do I hide a slide in Powerpoint?
To hide a slide in Powerpoint, simply go to the slide you want to hide and right-click on it. Then, click on “Hide Slide” from the dropdown menu. This will hide the slide from your presentation.
2. Can I hide multiple slides at once in Powerpoint?
Yes, you can hide multiple slides at once in Powerpoint. Simply select all the slides you want to hide by holding down the “Ctrl” key and clicking on each slide. Then, right-click on one of the selected slides and click on “Hide Slide” from the dropdown menu.
3. How can I make a hidden slide reappear in my Powerpoint presentation?
To make a hidden slide reappear in your Powerpoint presentation, go to the “Slide Show” tab and click on “Rehearse Timings”. This will bring up a sidebar with all your slides, including the hidden ones. Simply click on the hidden slide to make it reappear.
4. Is there a way to password protect hidden slides in Powerpoint?
Yes, you can password protect hidden slides in Powerpoint by going to the “Slide Show” tab and clicking on “Set Up Slide Show”. Then, check the box next to “Show Slide” and enter a password. This will prompt anyone trying to view the hidden slide to enter the password.
5. Can I hide a slide without deleting it in Powerpoint?
Yes, you can hide a slide without deleting it in Powerpoint. Simply go to the slide you want to hide and click on the “eye” icon in the slide thumbnail. This will hide the slide from your presentation while keeping it in your file.
6. How do I hide a slide from a specific audience in Powerpoint?
To hide a slide from a specific audience in Powerpoint, you can use the “Custom Slide Show” feature. First, go to the “Slide Show” tab and click on “Custom Slide Show”. Then, create a custom slide show with the slides you want to hide and present only that custom show to your selected audience. This way, they will only see the slides you want them to.
Leave a Reply